Tutorial amigurumi - Little Happy Whale

Nessun commento:
Mechanical and / or electronic reproduction of this pattern with sales intent is prohibited. 
Reselling it as an e-pattern is strictly prohibited. 
Marketing this product on a large scale is equally prohibited. 
The work created can be sold at fairs and on personal websites by citing the author of the project.
Thanks.


You will need:

- Two-colored wool (one for the back and fins / tail and one for the belly)
- Safety eyes (eyes for dolls, if you have not made them small circles with felt, you will waste more time but they are fine)
- Padding
- Stitch marker, crochet hook and wool needle.

Experience level:

Medium / easy (if you have already made amigurumi and are at least practical with crochet you will have no problems, the difficulty is in the stitching)

Pattern:

Let's start from the belly that you will have to do absolutely first.

Belly:
- 7 sc in magic ring
- 2 sc in each st  (14)
Work *2 sc in next st, sc in next 1 st, rep from * (21)
Work *2 sc in next st, sc in next 2 st, rep from *(28)
Work *2 sc in next st, sc in next 3 st, rep from * (35)
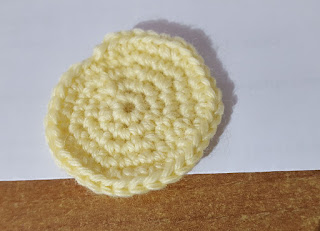
Close and hide the thread.

The belly!

Back:


- 7 sc in magic ring
- 2 sc in each st  (14)
Work *2 sc in next st, sc in next 1 st, rep from * (21)
Work *2 sc in next st, sc in next 2 st, rep from *(28)
Work *2 sc in next st, sc in next 13 st, rep from * (30)
- Work around (30)
Work *2 sc in next st, sc in next 3 st, rep from * (35)
- Work around (35)
- Work around (35)
- Work around (35)
Put the safety eyes on the first lap, leave 5-6 holes of space between one eye and the other.
If you use felt instead, sew the little eyes at the end of everything.

Ready for the safety eyes
Now ready to assemble


Now the "difficult" part, you have to join your back and belly.

For convenience, work keeping the back upside down and the belly up as you can see in the photo, the belly with the "beautiful" side on the outside.
Continuing to work with the back thread that we have not cut we knit the back stitches in back loop while we take the belly stitches in front loop.


It is easier to do it than to read it, don't worry, I hope you understand it in the picture.
If you are not with the front / back loop simply join the stitches.


When you are almost at the end fill the whale well and close with a very low stitch, cut and hide the thread.

Let's continue with the details.

Tail:
- 4 sc in magic ring
- 2 sc in each st  (8)
Work *2 sc in next st, sc in next 3 st, rep from * (10)
Close and leave long thread.

Make two circles to create the tail.
Use one of the long threads of the two circles to join the two circles (just sew two / three stitches together), with the other thread sew the whale's tail.
Pay attention to center from the opposite side of the eyes.

Side fins x2:
- 4 sc in magic ring
Work *2 sc in next st, sc in next 1 st, rep from * (6)
Work *2 sc in next st, sc in next 2 st, rep from *(8)
Close and leave long thread.
Sew the two fins to the sides.


Done!
Simple, right?


Send me photos of your works by email or tag me on facebook or instagram (froda_creazioni).
I hope it will help you during this strange period of lockdown. Stay safe!

Grazia
Leggi tutto...

Tutorial - Amigurumi - Piccola Balena felice

2 commenti:
La riproduzione meccanica e/o elettronica di questo pattern con intenti di vendita è
vietata. Rivenderlo come e-pattern è tassativamente proibito. Commercializzare questo
prodotto in larga scala è ugualmente proibito. Il lavoro realizzato può essere venduto alle
fiere e nei siti web personali citando l’autore del progetto. 
Grazie.


Occorrente:
- Lana di due colori (uno per la schiena e pinne/coda ed uno per la pancia)
- Safety eyes (occhi per bambole, se non li avete ricavate dei piccoli cerchietti con il feltro, perderete più tempo ma vanno benissimo)
- Imbottitura
- Marcapunti, uncinetto ed ago da lana

Livello esperienza: 
Medio/facile (se avete già fatto amigurumi e siete un minimo pratici con l'uncinetto non avrete problemi, la difficoltà è nella cucitura)

Schema:

Iniziamo dalla pancia che dovrete fare assolutamente per prima.

Pancia:  

- 7 mb nell'anello magico (magic ring)
- 2 mb in ogni punto (14)
- *2 mb nel primo punto, 1 nel successivo* ripetere fino alla fine del giro (21)
- *2 mb nel primo punto, 1 mb nei 2 punti successivi* ripetere fino a fine giro (28)
- *2 mb nel primo punto, 1 mb nei 3 punti successivi* ripetere fino a fine giro (35)
Chiudi con maglia bassissima e nascondi il filo.

Pancia pronta!

Schiena:

- 7 mb nell'anello magico (magic ring)
- 2 mb in ogni punto (14)
- *2 mb nel primo punto, 1 nel successivo* ripetere fino alla fine del giro (21)
- *2 mb nel primo punto, 1 mb nei 2 punti successivi* ripetere fino a fine giro (28)
- *2mb nel primo punto, 1 mb nei 13 punti successivi* ripetere fino a fine giro (30)
- 1 mb in ogni punto (30)
- *2 mb nel primo punto, 1 mb nei 5 punti successivi* ripetere fino a fine giro (35)
- 1 mb in ogni punto (35)
Mettete i safety eyes sul giro prima, lasciate 5-6 buchi di spazio tra un occhietto e l'altro.
Se invece usate il feltro cucite gli occhietti alla fine di tutto.

Schiena pronta per gli occhietti
Occhietti e via a cucire!

Ora la parte "difficile", bisogna unire schiena e pancia.
Per comodità lavorate tenendo la schiena sottosopra e la pancia in alto come vedete in foto, la pancia con il lato "bello" sull'esterno.
Continuando a lavorare con il filo della schiena che non abbiamo tagliato lavoriamo le maglie della schiena in back loop mentre prendiamo le maglie della pancia in front loop.


E' più semplice a farlo che a leggerlo, non vi preoccupate, spero si capisca in foto.
Se non vi trovate con il front/back loop unite semplicemente le maglie.


Quando siete quasi arrivate alla fine riempite bene la balena e chiudete con una maglia bassissima, tagliate e nascondete il filo.

Proseguiamo con i dettagli.

Coda:
- 4 mb nell'anello magico (magic ring)
- 2 mb in ogni punto (8)
- *2 mb nel primo punto, 3 nel successivo* ripetere fino alla fine del giro (10)
Chiudi con maglia bassissima e lascia filo lungo.
Fai due cerchietti per creare la coda.
Usa uno dei fili lunghi dei due cerchietti per unire i due cerchi (basta cucire due/tre punti assieme), con l'altro filo cuci la coda alla balena.
Presta attenzione a centrare dal lato opposto degli occhietti.

Pinne laterali x2:
- 4 mb nell'anello magico (magic ring)
- *2 mb nel primo punto, 1 nel successivo* ripetere fino alla fine del giro (6)
- *2 mb nel primo punto, 2 nel successivo* ripetere fino alla fine del giro (8)
Chiudi con maglia bassissima e lascia filo lungo.
Cuci le due pinne ai lati.


Fatto!
Semplice vero?


Mandatemi le foto dei vostri lavori via mail oppure taggatemi su facebook o instagram (froda_creazioni)

Spero che possa farvi passare un po' di tempo in queste luuuuuuunghissssssssiiiiiime giornate in casa.
Un abbraccio
Grazia

English version in next post! ^-^
Leggi tutto...